EZ Snap™ Covers recognized a problem and created the only patent-pending tamper-resistant commercial baseboard heater cover. It not only protects children and pets from the sharp hazard but also prevents whole apartment heater covers from growing legs and walking out the door. We developed LOCKDOWN specifically to protect children and pets, at the same time saving the housing authorities and the American people millions of dollars by prolonging the life of the heating system. LOCKDOWN keeps children's little fingers and toes away from the razor-like fins and also mechanically fastens the covers to the building, preventing theft and saving potentially millions of dollars in replacement costs. LOCKDOWN is a One and Done product. Install our commercial baseboard heater covers once and never replace them again.
CONCERNED ABOUT THEFT OR MISSING PARTS?
Theft of baseboard heaters for scrap metal is a major issue facing housing authorities. EZ Snap™ has created a new, patent-pending, tamper-resistant baseboard heater cover called LOCKDOWN, addressing your problems head-on.
LOCKDOWN Heater Covers are a new, patent-pending, tamper-resistant, replacement commercial baseboard heater cover for hydronic heating systems that are mechanically fastened to the wall. With the theft of hot water baseboard heaters for scrap metal, costing housing authorities and building owners millions of dollars annually LOCKDOWN Heater Covers addresses the problem head-on. By preventing missing parts and complete removal of baseboard heating units LOCKDOWN Heater Covers keeps you in compliance avoiding costly fines and replacement costs.
Always measure left to right, and twice for accuracy
Step 1: Floor to top of Wall plate
Measure the height from the floor to the top of the metal wall plate.
Follow our guide for baseboard heater cover measurement:
Any baseboard larger than 7 3/8" (188 mm) will be compatible with our standard cover.
Any measurement greater than 9 3/8" (238 mm) will fit our tall cover.
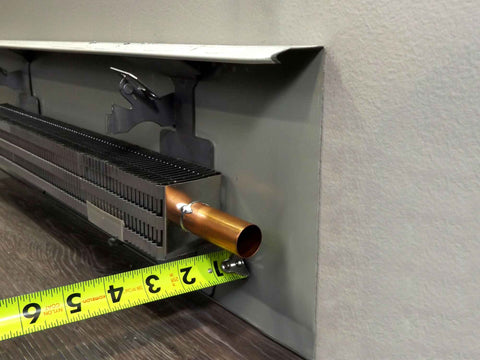
Step 2: Bottom of Fintube to Top of Wall Plate
Measure from the bottom of the finned tube heating element to the top of the metal wall plate,
A measurement of 5 1/2" to 6 3/4" (140 mm – 172 mm) will fit our standard cover.
A measurement of 7 1/2" to 8 3/4" (191 mm – 222 mm) will fit our tall cover.
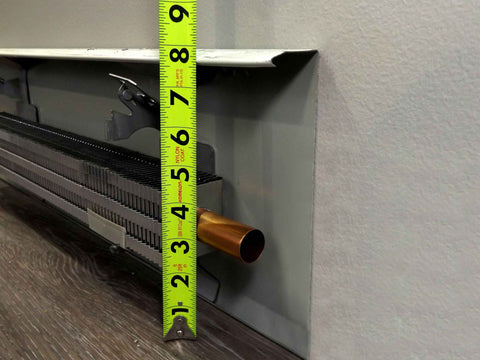
Step 3: Back Wall to Front of Fintube
Measure the distance from the wall or the metal wall plate attached to the wall, to the outside of the finned tube heating element.
Any measurement of less than 3 1/8" (76 mm) inches from the wall will fit our
standard cover.
Any measurement of less than 3 1/8" (76 mm) inches from the wall will fit our tall cover.
Step 2 DETERMINE IF BRACKETS ARE NECESSARY
Always measure left to right, and twice for accuracy
Wall Widget
EZ Snap™ Wall Widgets are used when your old or existing wall back plate has been removed or if you have to hang your new cover 1 inch or higher to bring them up to a height that will fit our installation guidelines. Just measure your overall desired height, subtract 1", drill a hole, preferably in a stud and attach it to the wall with the included screw.
Floor Fidgets
EZ Snap™ Floor Fidgets easily raise your new covers ¾ inch to compensate for any ¾ inch floor (wood, tile, or other) that has been installed any time since your baseboard heater was originally installed. May be used for any reason when the overall height has been shortened and the total height is less than 7-½ inches for standard height or 9-½ inches for the TALL height EZ Snap™ BaseBoard Covers. Just use the self-tapping screws to secure them to the top of your existing wallplate.
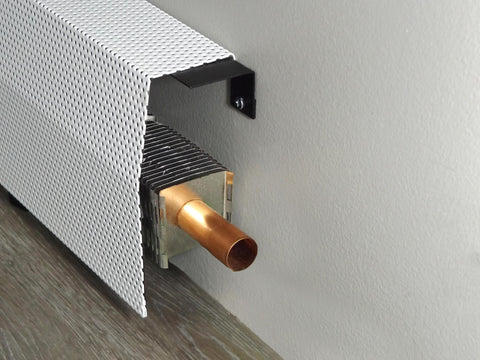
Wall Contraptions
EZ Snap™ Wall Contraptions are used when your wall back plate has been completely removed. EZ Snap™ Wall Contraptions receives your EZ Snap™ BaseBoard Cover and keeps your aluminum fin tube from sagging. These completely replace your wall back plate. To install, slide up from the bottom and make sure the top is at your desired height. Screw to the wall, then bend the front finger up to hold the fin tube in place.
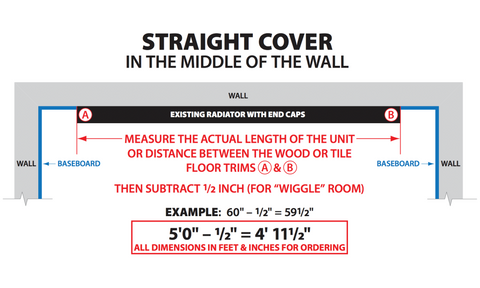
Step 3
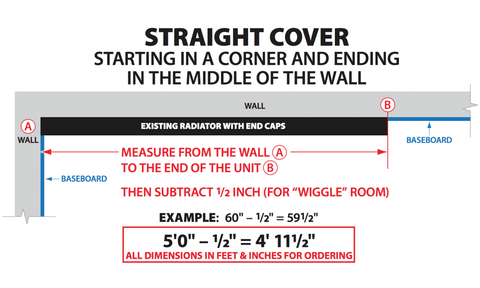
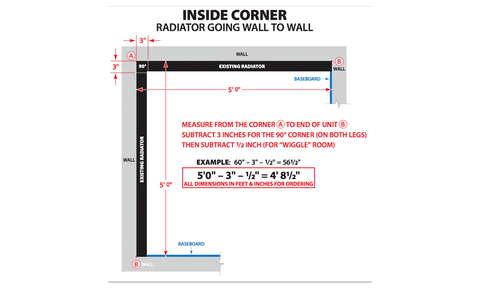
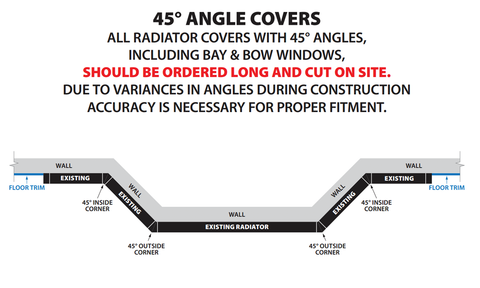
HOW TO MEASURE LENGTH
Based on how your heater is configured,
choose an option below to expand and view
specific hot water baseboard heater measurement templates.
Measure from wall to wall and subtract ½ inch (to allow for wiggle room when installing your new covers.) The endcaps can be pulled or slid ½ inch outward on either end to fit your existing length requirements. Choose 2 flush to wall end caps.
Measure the overall length of the existing unit with ends attached then subtract ½ inch (to allow for wiggle room when installing your new covers.) The endcaps can be pulled or slid ½ inch outward on either end to fit your existing length requirements. Choose 2 Closed or Open-end caps.
Measure from the corner to the end of the unit with ends attached then subtract ½ inch (to allow for wiggle room when installing your new covers.) The endcaps can be pulled or slid ½ inch outward on either end to fit your existing length requirements. Choose 1 Closed or Open-end & 1 flush to wall end cap.
Measure the left side from corner A to corner B (see diagram). Then subtract 3 inches for the 90 degree inside corner, then subtract another ½ inch (to allow for wiggle room when installing your new covers.) Repeat for the right side if also wall to wall. You need to subtract a total of 3½ inches from each side that is wall to wall. Choose your end caps.
Measure the left side from the corner of the wall to the end of the unit with ends caps. Then subtract 3 inches for the 90 degree inside corner, then subtract another ½ inch (to allow for wiggle room when installing your new covers.) Repeat for the right side. You need to subtract a total of 3½ inches from both left and right sides. Choose your end caps.
L-Shaped outside radiators ending in the middle of the wall: Measure from outside corner of the wall A to the end of the radiator unit with end caps attached B, then subtract ½" (to allow for wiggle room when installing your new covers.)
Left leg - measure from the corner out to the end of the radiator subtract 3" for the corner and ½ (to allow for wiggle room when installing your new covers.)
Center leg - measure from corner to corner and subtract 3" for each corner a total of 6"
Right leg - measure from the corner out to the end of the radiator subtract 3" for the corner and ½" (to allow for wiggle room when installing your new covers.).
We recommend that you order covers a little longer than normal and cut them on site, as there are many opportunities for mistakes in measuring and installation. By cutting on site you can fit and cut to fit. The covers can be cut with a good quality jigsaw and a fine metal cutting blade.
TWO SIDES HAVE SPACES AND WRAP AROUND WALL TO WALL SECTIONS
Measure from the corner of the wall to the outside corner. Subtract 3" for the 90 degree corner (for both left and right legs). Measure from the corner to the end of the unit with end caps on. Subtract 3" for the 90 degree corner then subtract ½" for wiggle room.