If you've been staring at rusty, dented, or outdated baseboard heater covers, wondering how to replace them without calling in a pro, you're in the right place. Believe it or not, replacing baseboard heater covers is a simple DIY project that doesn’t require advanced tools, technical know-how, or hours of work. With the right guide (and we’ve got that covered), you can enhance your space with elegant, functional covers in no time.
Whether you're looking to fix unsightly heaters, improve performance, or give your home a fresh, updated look, replacing your old heater covers is a quick project that delivers big results. Follow along as we explain how easy it is to replace baseboard heater covers yourself and guide you through the step-by-step process.
Why Replace Baseboard Heater Covers?
Baseboard heater covers play a key role in form and function. Over time, however, they can experience wear and tear. Explore why replacing them might be the upgrade your home needs.
Fix Rust, Dents, and Wear
It’s natural for heater covers to develop rust or show dents over time, especially in humid areas like bathrooms. These issues aren’t just eyesores; they can also lead to reduced efficiency. Replacing them enhances aesthetics and ensures improved air circulation and better heat distribution.
Modernize Your Style
Outdated covers can bring down the overall look of a room. Upgrading to sleek, modern designs, like EZ Snap™ Covers, allows you to match your decor and create a unified style.
Improve Safety
Damaged or outdated covers can leave sharp edges exposed or increase the chance of accidents. A new cover, especially one with child-safe features, minimizes injuries and protects fingers from the heating elements inside.
Longevity and Durability
Newer covers, like those from EZ Snap™ Covers, are manufactured with galvanized steel and finished with epoxy bake-on coatings. This ensures they’re rust-proof and durable enough to stand the test of time.
Assessing Your Current Baseboard Heaters
Before jumping into replacement, start with a quick assessment of your existing heaters. Look for damage like rust spots, chipped paint, or dents. Check clearance to ensure your current cover is not too close to the wall or floor, as this can affect airflow. Finally, determine what’s missing (e.g., brackets, end caps, or backplates), as this will influence what parts you need to buy.
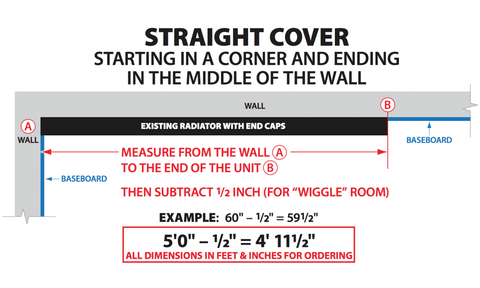
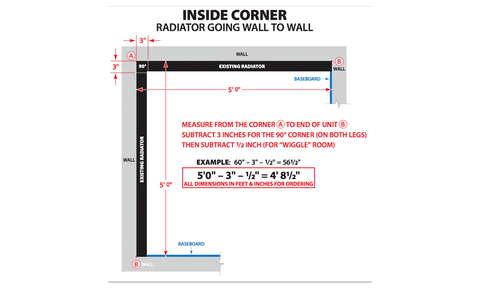
Measuring for New Covers
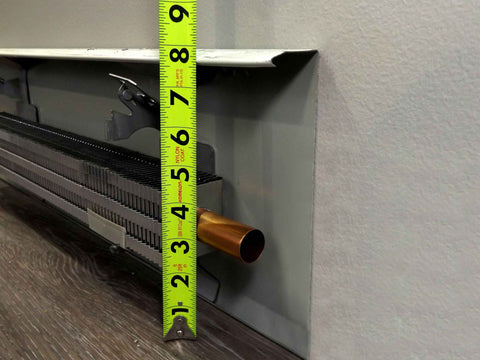
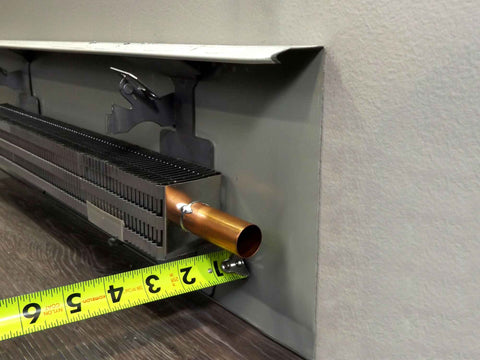
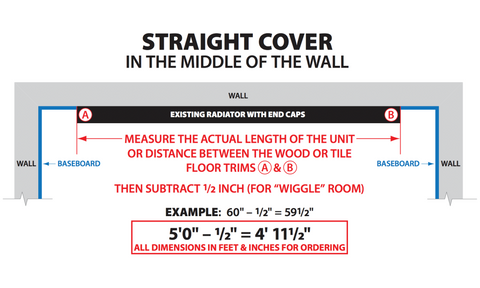
Accurate measurements are critical to ensure seamless replacement. Start by measuring the length of the cover. Use a tape measure and note the total length of the existing cover from end to end. Subtract half an inch for wiggle room when installing, depending on the configuration.
Next, assess the height and depth. Measure the height from the baseboard plate to the top of the existing cover, as well as the depth from the wall to the outside of the heater.
Pro tip: EZ Snap™ Covers come with downloadable measuring worksheets to guide you step by step.
Choosing the Right Replacement Covers
Now that you know what you need, it’s time to select your new covers. Here’s what to consider:
Materials
-
- Galvanized steel: Durable, rust-proof, and perfect for long-term use. EZ Snap™ Covers are crafted from sturdy 20-gauge galvanized steel.
-
- Plastic: Lightweight and affordable, but less durable over time.
-
- Custom coatings: Some options, like EZ Snap Cover’s semi-gloss white or Silverado finishes, can be painted for further customization.
Color and Style
-
- Stick to neutral tones like white or steel for a timeless look.
-
- Sleek, perforated designs can add a modern touch without being overly flashy.
Features of EZ Snap™ Covers
-
- Lifetime Rust-Free Warranty
-
- Easy Snap-Together Installation for a hassle-free experience.
-
- Custom kits for unique configurations, angles, and lengths.
Why not explore EZ Snap™ Covers today? Our kits are tailored to fit most setups and can be further customized with accessories such as couplers, corner angles, and end caps.
Step-by-Step Guide to Replacing Baseboard Heater Covers
Here’s how to go from old and rusty to sleek and modern in just a few easy steps:
1. Gather Your Tools
You’ll need:
-
- Tape measure
-
- Safety gloves
-
- Screwdriver
-
- (Optional) Jigsaw with a fine-tooth metal blade for custom cuts
2. Remove the Old Covers
Start by gently popping off the end caps; most slide out easily. Next, detach the cover panel, lifting it away from the backplate. If it’s stuck due to paint or caulk, carefully cut along the edges with a utility knife. Don’t forget to dispose of waste responsibly. Metal parts can be recycled or returned to companies like EZ Snap™ for eco-friendly disposal.
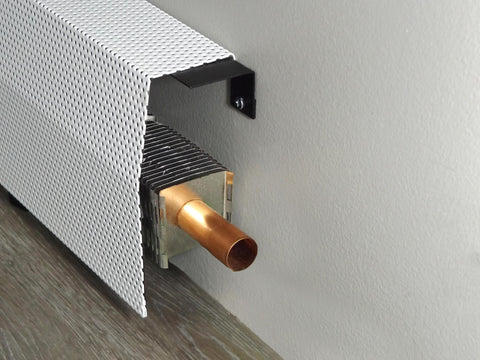
3. Snap on the New Covers
First, install wall widgets or brackets. These helpful add-ons create proper alignment and ensure a secure fit. Next, attach the main cover, snapping it securely over the backplate. Finally, add the end caps. Push or slide them into place for a clean, finished look.
Most people find EZ Snap™ Covers so simple to install that they finish in under 15 minutes!
4. Adjust and Customize
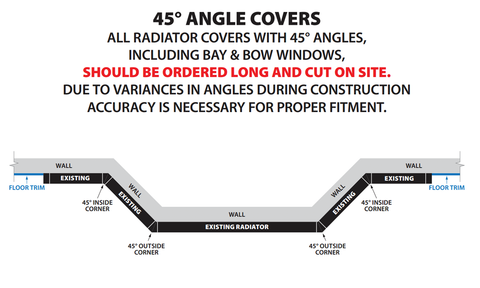
If you’re dealing with unique angles or unusual configurations, use couplers and corner pieces to connect sections seamlessly.
Customization and Special Situations
Do you have a corner heater or an oddly shaped setup? No worries.
-
- Use corner angle pieces for L-shape or U-shape heaters.
-
- Cut EZ Snap™ Covers to size with the proper tools for a perfect fit.
-
- Install optional floor fidgets to raise covers higher if needed for newer floors.
The flexibility of EZ Snap™ Covers means no project is too complex.
Safety and Maintenance Tips
To ensure your new covers look great and perform well for years to come, follow these tips:
Installation Safety
-
- Wear gloves and safety glasses to protect against sharp edges.
-
- Check that all components are securely snapped into place to avoid accidental disassembly.
Maintenance
-
- Clean regularly with a damp cloth to remove dust and debris.
-
- For painted finishes, avoid harsh chemicals that might damage the coating.
EZ Snap™ Covers take things one step further by offering rust-proof warranties, so you can rest easy knowing your covers are built to last.
Upgrade Your Space Today
Replacing baseboard heater covers isn’t just a practical home improvement project. It’s an opportunity to enhance the style and function of your living space with minimal effort. Understanding how easy it is to install baseboard heater covers will have you making the upgrade in no time. With easy-to-install options like EZ Snap™ Covers, transforming your heaters into safe, modern, and polished features takes less time than watching your favorite TV show.
Why wait? Elevate your heaters today with baseboard heater replacement covers from EZ Snap™ Covers. Contact us today to find the perfect covers for your home and start your DIY transformation.


