Is your baseboard heater cover rattling, sagging, or just not staying in place? Don’t worry, you’re not alone! Baseboard heater covers can become loose over time for various reasons, but the good news is that fixing them is often simple and can dramatically improve their functionality and appearance.
This guide will walk you through everything you need to know, including ten tips for fixing loose baseboard heater covers.
Understanding Baseboard Heater Covers
Baseboard heaters are a popular heating solution, especially in colder climates. These covers serve an essential function—to protect the heating element from damage and keep you safe from accidental burns, but they’re also a key design feature in your space.
Typically made from metal, baseboard heater covers snap or screw into place over the heater, concealing the inner workings and giving the room a polished look. However, wear and tear can cause these covers to loosen with time, making them wobbly or even detached. Understanding how they work and how to maintain them will help you avoid these common problems.
Benefits of Baseboard Heater Covers
Why bother with baseboard heater covers at all? Here’s why they’re essential:
- • Safety: Heater covers act as a protective barrier, preventing accidental contact with the heating elements. This is especially important in households with children or pets, where the risk of burns can be higher. A sturdy cover ensures everyone stays safe, even when the heater is in full use.
- • Aesthetics: Let’s face it—exposed baseboard heaters aren’t the most attractive feature in a room. A well-designed cover hides the unsightly metal components and adds a touch of style and sophistication. Whether you’re looking for a modern or classic look, heater covers can effortlessly complement your interior design.
- • Protection: Over time, heating elements can collect dust, dirt, and debris, which may reduce their efficiency. Additionally, they’re vulnerable to accidental damage, like being kicked or struck by furniture. A quality heater cover shields the delicate parts from harm, extending the life of your heating system.
- • Efficiency: Heater covers are designed to allow optimal airflow, ensuring your baseboard heaters work as efficiently as possible. Proper ventilation helps the heater distribute warmth evenly across the room, keeping you cozy while potentially reducing energy costs.
Investing a little time and effort into maintaining or upgrading your heater covers can make a big difference in safety, functionality, and the overall look of your space. It’s a small step that delivers long-term benefits for your home.
Importance of Proper Maintenance
Like any part of your home, baseboard heater covers require regular maintenance to ensure they function properly and maintain their appearance. Loose or damaged covers can negatively impact the heater's performance, pose potential safety risks, and detract from the overall look of your space. Over time, wear and tear, accidental bumps, or environmental factors like moisture can cause covers to loosen, rust, or become damaged, reducing their efficiency and aesthetic appeal.
By inspecting and maintaining your baseboard heater covers, you can keep them securely in place, prevent rust or other damage, and help your heating system work more effectively. Proper care doesn’t have to be time-consuming, and addressing minor issues early can save you from larger, more expensive problems down the line. The following tips will guide you through fixing loose baseboard heater covers step by step, ensuring they remain safe, functional, and visually appealing for years.
Tips for Fixing Loose Baseboard Heater Covers
Fixing loose baseboard heater covers is straightforward when you know where to start. From inspecting fasteners and cleaning surfaces to reattaching critical components, these steps will help you tighten things up without breaking a sweat.
1. Gather Your Supplies
Before fixing your heater covers, ensure you have the tools you’ll need. Common tools include a screwdriver, replacement screws or clips, and a clean cloth for wiping down surfaces. Having everything on hand ensures the process is quick and easy. If your cover requires new parts, such as clips or couplers, consider purchasing durable replacements.
2. Inspect the Fasteners
The first step is to inspect any screws, brackets, or clips on your baseboard heater cover. Look for missing fasteners, loose screws, or worn-out parts that might be causing the cover to shift. Identifying these issues early will help you know exactly what repairs or replacements are needed.
3. Tighten Loose Screws
If the screws securing the cover have become loose over time, tighten them with a screwdriver. However, be careful not to overtighten, as this might strip the screw threads or damage the cover itself. A firm but gentle hand will do the trick!
4. Replace Worn Clips or Couplers
Worn-out clips or couplers can also cause your heater cover to come loose. If you notice bent or broken components, replace them with new ones for a secure fit. Consider looking for snap-on clips that provide a snug, reliable grip.
5. Clean the Surface Before Reinstallation
Dust and debris can interfere with the proper attachment of your heater cover. Clean all the surfaces thoroughly with a damp cloth before reinstalling the cover. This simple step ensures smooth connections and reduces the chances of future problems.
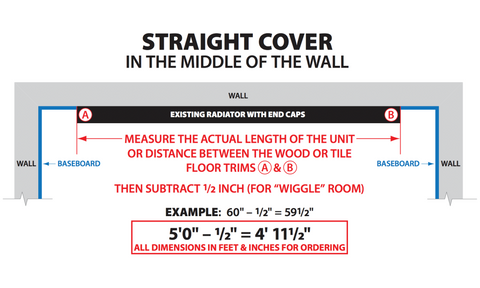
6. Reattach End Caps Securely
End caps play a critical role in keeping your heater cover secure. Check that each end cap is snugly fitted and locked into place. They should sit flush against the wall to prevent shifting or rattling when the heater is in use.
7. Consider a Replacement Cover
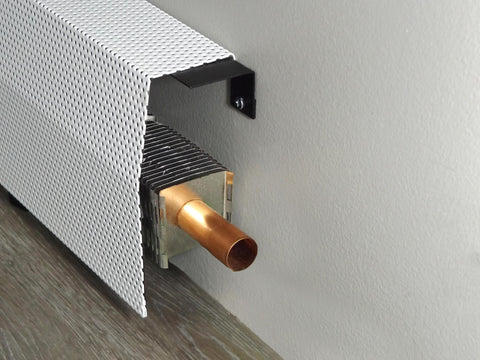
If you’ve tried all the steps above but your baseboard heater cover is still loose or damaged, it might be time to invest in a replacement. EZ Snap Covers are an excellent option! Not only are they incredibly easy to install, but their durable, rust-proof design ensures long-term reliability. With a sleek, modern look, these covers upgrade your space while solving the problem of loose or inefficient covers once and for all.
8. Watch Instructional Videos
If you’re more of a visual learner, EZ Snap Covers provides step-by-step installation videos that walk you through the process. We demonstrate exactly how to snap the covers into place seamlessly and confidently, ensuring a flawless setup every time.
Maintain Your Baseboard Heater Covers with Ease
Maintaining your baseboard heater covers isn’t just about fixing loose components—it’s about safety, efficiency, and keeping your space looking its best. You can restore your covers to a secure and functional state by following these helpful tips for fixing loose baseboard heater covers.
EZ Snap Covers offers the ultimate upgrade for those looking for a hassle-free solution. Check out our durable baseboard heater replacement covers, which are built to last and designed to be easy to install. Explore EZ Snap Covers today and see how we can help transform your heating system and home!


