Are you tired of rusty, outdated baseboard heaters detracting from your space? Upgrading to new, stylish covers is easier than you might think and can completely transform your room’s look without professional assistance. Whether you’re a homeowner sprucing up your living space or a property manager tackling multiple units, you can’t miss this guide. Ahead, learn how to install your baseboard heater covers quickly and efficiently.
Understanding Baseboard Heater Covers
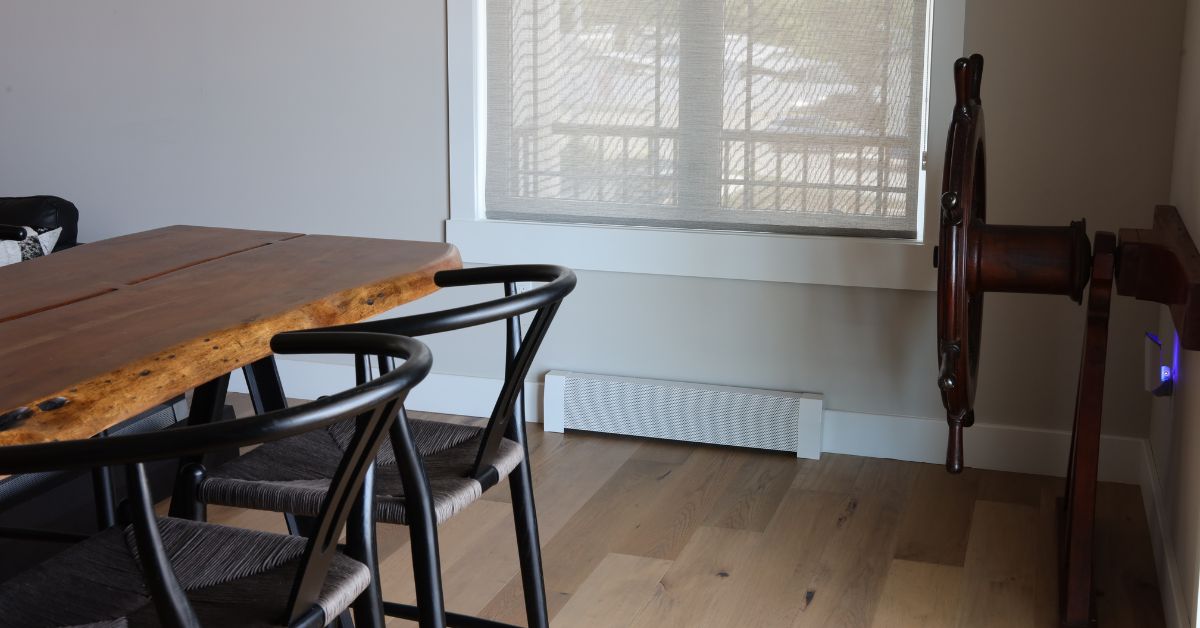
Baseboard heater covers are protective casings designed to fit over your existing heaters. Aside from hiding unsightly heaters, these covers double as a shield, preventing direct contact with the heating element and reducing the risk of injuries and burns. Stylish and durable, modern heater covers are typically made from galvanized steel with a powder-coated finish so they’re rustproof and long-lasting.
These covers are not just a cosmetic upgrade, though. They also increase safety in spaces with children or pets and can even improve heat distribution, making baseboard heater covers a smart investment for any home or rental property.
Installing Your Baseboard Heater Covers
Installing baseboard heater covers requires following these simple steps.
Take Accurate Measurements
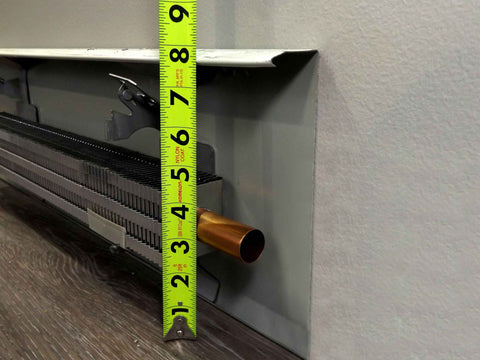
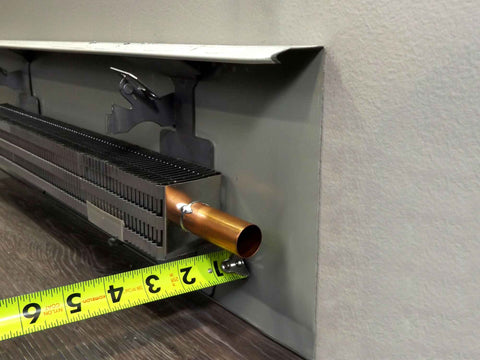
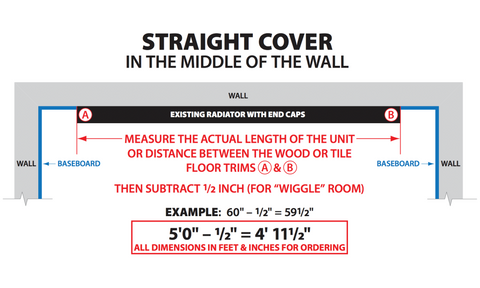
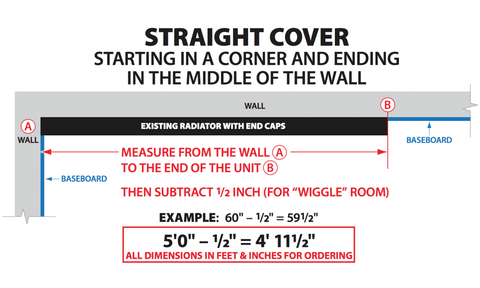
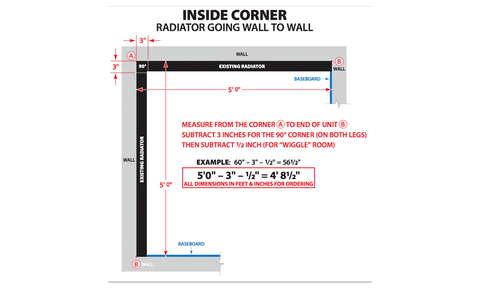
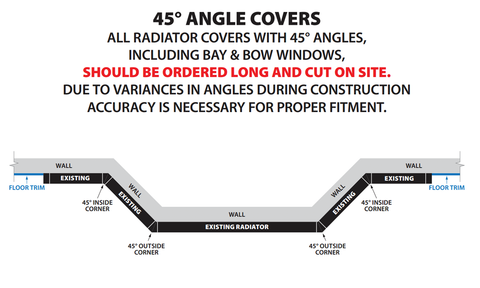
Measure your current heaters so the new covers fit properly. Use a tape measure, jotting down the length, height, and depth of your heaters. Don’t forget to download measuring worksheets from the manufacturer’s website for added accuracy.
Remove Old Baseboard Heater Covers
Carefully remove the old endcaps, faceplate, and dampers. Wear safety glasses and gloves to protect yourself from sharp edges. If the old covers are painted or caulked to the wall, you may need a utility knife to cut along the caulking line to gently loosen them. Go slowly and work carefully to avoid damaging your walls.
Inspect for Wall or Heater Damage
Once you’ve removed the old covers, inspect the wall and heater for signs of damage, such as rust or loose parts. Clean the heater’s surface to remove dust and debris, preparing it for the new covers. This is also an excellent opportunity to repair or reinforce loose components.
Recycle Old Covers and Parts
Instead of throwing out your old heater covers, consider recycling them. Many manufacturers, like EZ Snap Covers, offer recycling services where you can ship your old steel parts to them for proper disposal. Alternatively, take your old covers to your local recycling center for sustainable repurposing.
Build Your Kit or Custom Order Correctly
Next, it’s time to order your new baseboard heater covers. The Kit Constructor offered by EZ Snap Covers is easy to use; just input your measurements to create a custom order. Double-check your dimensions, and don’t hesitate to contact our customer support if you have questions along the way.
Unpack and Verify the New Covers
When your new covers arrive, carefully unbox them to avoid accidental damage. Verify that all parts you have are on the included parts list. Next, inspect each item for signs of shipping damage, such as scratches, dents, or cracks. If you notice issues, report them within seven days and include photos for proper documentation for a smooth resolution process.
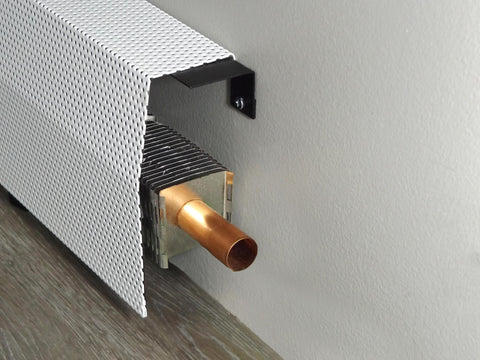
Install the Cover
Carefully place the new cover over your heater, checking that it aligns properly with the backplate. Double-check that everything is positioned correctly before proceeding. Once you’re confident the cover is in the right place, snap on the endcaps to secure it.
Adjust for Tight-Fitting Endcaps
If the endcaps feel too tight during installation, pre-fit them onto the panels before mounting the cover. This step identifies potential adjustments needed before the final installation. If your endcaps require modification, use a jigsaw equipped with a fine-tooth metal blade to make clean, precise cuts. The cover will now fit seamlessly, eliminating gaps or irregularities for a polished, professional finish.
Customize Lengths If Necessary
If your covers are too long, don’t worry. You can easily trim them down to size using tools like a fine-cut metal blade jigsaw. Go slowly when cutting to avoid bending or damaging the material. For those who want to save time and effort, many suppliers offer the option of free custom cuts when placing your heating cover order. This convenient service ensures a hassle-free experience and perfectly sized covers right from the start.
Check That Safety Features Are in Place
Once installed, confirm that the child-safe features are working as intended. While covers reduce the risk of heater burns, remember that the surface can still get hot depending on the heater’s temperature. Confirm that gaps and holes are small enough to prevent little fingers from reaching through to the heating fins.
The Benefits of Baseboard Heater Covers
Why should you upgrade to baseboard heater covers? Here’s a breakdown of the key benefits:
-
• Enhanced aesthetics: You can use baseboard heater covers to transform your old, damaged heaters into sleek, stylish features that enhance the look of your space. Our designs ensure your new heater blends seamlessly with your decor while adding a touch of modern elegance.
-
• Improved safety: Keep small hands and curious pets safe from harm with our thoughtfully designed child-safe features. These designs protect against sharp edges and hot surfaces, giving you peace of mind at home.
-
• Rust resistance: High-quality covers like those from EZ Snap Covers are designed to stand the test of time. Rust-proof galvanized steel provides durability and reliability so it lasts a lifetime.
-
• Easy installation: Most modern covers are user-friendly and require no specialized tools or expertise. They’re an ideal choice for anyone looking to take on a simple and satisfying DIY project at home.
-
• Eco-friendly options: Many baseboard heater covers are recyclable, reducing landfill waste and promoting a cleaner environment.
Give Your Heaters the Upgrade They Deserve
By following the above steps, you can easily install your baseboard heater covers and enjoy all their benefits, from improved safety to enhanced design. Once installed correctly, these covers will elevate your space’s aesthetic and provide long-lasting functionality.
If you’re ready to update your heaters, check out EZ Snap Covers for all your decorative baseboard heater cover needs. With their rust-free lifetime warranty and professional customer support, you’ll love the upgrade.


