Baseboard heater covers are essential for style and safety. Updating old covers is a quick way to modernize a room, protect the heater, and keep sharp edges and hot elements out of reach. However, improper installation can lead to costly issues, so
it's crucial to do it right. This guide will help teach you the mistakes to avoid when installing baseboard heater covers to ensure a successful upgrade.
The Risks of Improper Installation
When baseboard heater covers are improperly installed, the consequences extend beyond aesthetics. One of the most significant risks is poor heater performance. Covers that don’t fit properly or block vent openings can restrict airflow, reducing the heater’s efficiency and leading to uneven heating or overheating.
A poorly installed cover can also pose safety hazards. For instance, if the cover isn’t securely fastened, it can quickly shift or fall off, especially in high-traffic areas. This could expose sharp edges or hot components, presenting a risk for accidental burns or cuts.
Lastly, improper installation of heater covers that do not conduct heat properly can reduce the lifespan of the boiler itself. As steel is a fantastic conductor of heat, plastic covers are actually an insulator of heat. This causes your whole system to work overtime to heat the space you are heating. Over time, this means more money is spent on replacing or repairing boilers and your whole system.
The Importance of Proper Installation
Installing your baseboard heater covers correctly is essential for functionality and peace of mind. Properly mounted covers ensure your heaters perform as intended, distributing heat efficiently through the room while maintaining safety for everyone in your household.
Well-installed covers also add to the aesthetic appeal of a space. Clean, neatly installed covers can elevate the look of any room, making it appear polished and well-maintained—a particularly important factor for property managers showcasing rental units.
Beyond aesthetics and safety, proper installation ensures the longevity of the covers themselves. By following guidelines and avoiding mistakes, you can save yourself the hassle of frequent replacements and keep your investment intact for years.
Common Mistakes To Avoid During Installation
Installing baseboard heater covers is relatively simple, but there are some common pitfalls that even seasoned DIYers can stumble upon. By being aware of these errors, you’ll be better equipped to complete the project successfully and with fewer frustrations. Here are the most frequently encountered mistakes and how to avoid them.
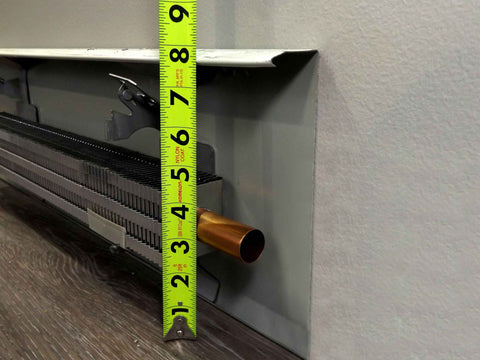
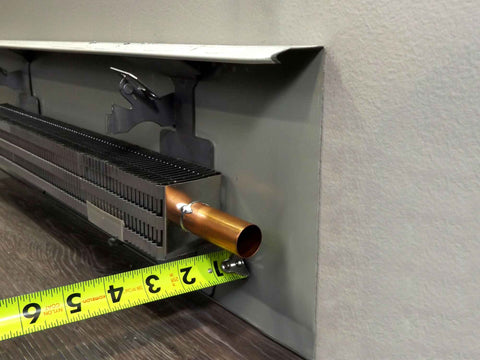
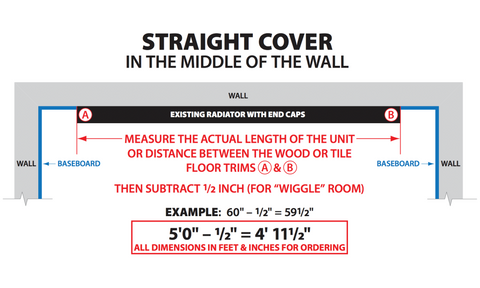
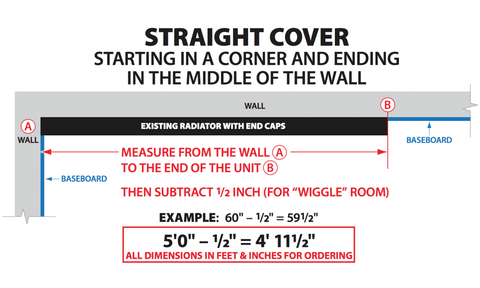
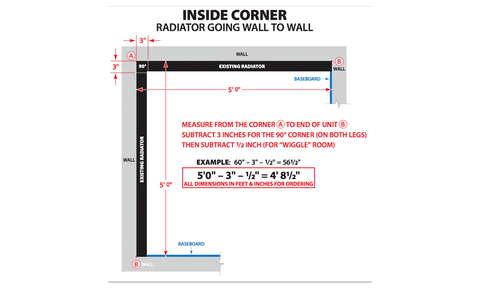
Incorrect Measurements
Getting the measurements wrong is a sure way to derail your installation project. Failing to accurately measure the height, length, or depth of your existing baseboard heater can lead to covers that don’t fit. This results in covers that are too short, too tall, too long or worst of all not long enough. This leads to returns and reordering properly fitting covers, resulting in more time and money to complete the project.
Always measure your baseboard heater dimensions carefully before purchasing your covers. Make sure that you measure twice to ensure precision. Many manufacturers provide sizing guides to help you choose the right product, so take full advantage of those resources.
Using the Wrong Tools
Installation is pretty basic and simple for an average DIYer. Installing baseboard heater covers without the proper tools is like trying to build furniture without a hammer—it’s bound to end in frustration. Using incorrect tools can result in improper installation and damage to the covers or the heater.
Ensure you have the proper equipment at hand before starting your installation. A measuring tape, screwdriver, level, and a good jigsaw with a fine metal cutting blade (if you have to cut the cover) are used. Having the right tools ensures a smooth and efficient installation process.
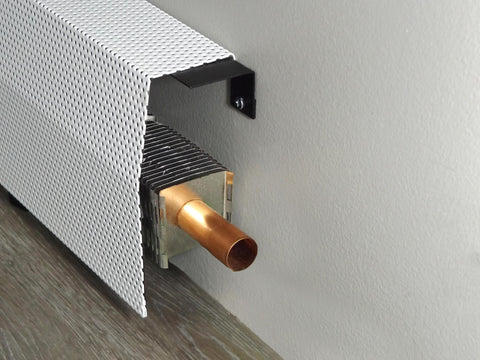
Skipping Surface Preparation
Ignoring surface preparation might save time initially but will cause major headaches down the line. Dirt, grime, or hair left on the heater surface can impact how the covers fit and perform, resulting in a sloppy look and can make your boiler work overtime. Once you have all the old heater covers removed for installation of your new covers, vacuum all the remaining fintubes and brackets. After years of use, they are likely full of debris and could use a good cleaning.
Always clean and prep the heater surface before installation. If there’s rust, paint the surface to ensure a clean base for your new covers.
Blocking Vent Openings
Ventilation is key to your heater's performance, and blocking vent openings with drapes or furniture can severely reduce airflow. Limited airflow decreases heater efficiency and can lead to your boiler and system working overtime and prematurely wearing out your system overheating.
When installing your covers, double-check that all ventilation openings are unobstructed.
Choosing Poor-Quality Materials
Low-quality plastic covers might seem like a budget-friendly option upfront, but they can wear down quickly, losing their aesthetic and functional appeal. Cheap poorly made covers are also more likely to crack, discolor or warp over time. Plastic is an insulator of heat not a conductor.
Invest in high-quality baseboard heater covers that are durable and designed to last. High-quality materials often include features like rust resistance and easy maintenance, ensuring that your covers stay in good condition over the long haul.
Not Following Manufacturer Instructions
Every product comes with a set of manufacturer guidelines for a reason. Ignoring these instructions increases the likelihood of improper installation, leading to performance issues or early wear and tear on your system.
Take the time to carefully read and follow the instructions provided with your baseboard heater covers. These guidelines are tailored to the specific product and are your best resource for a successful installation.
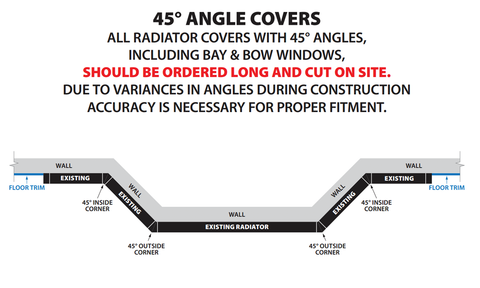
Poorly Executed Custom Cuts
Some baseboard heater covers may require trimming or cutting to fit the specific dimensions of your heater. Poorly executed cuts can compromise the cover's appearance and functionality.
Use precise tools and techniques to ensure clean, accurate cuts. If you’re unsure, don’t hesitate to consult a professional or watch a tutorial from the manufacturer to guide you through the process.
Neglecting Safety Precautions
Forgetting basic safety measures—like turning off the heater and letting it cool—can result in burns, or other accidents. Safety should always be your top priority when working with heating equipment.
Before installing, make sure the heater is turned off and thoroughly cooled. Wearing gloves can further minimize potential risks.
Perfect Your Baseboard Heater Covers Installation Today
Installing baseboard heater covers properly enhances the safety and performance of your heaters and elevates the overall look of your space. By understanding the common mistakes to avoid when installing baseboard heater covers, you can ensure a seamless, hassle-free project with results you’ll be proud of.
If you’re looking for high-quality, easy-to-install baseboard heater covers, check out the selection from EZ Snap Covers today. Their durable, stylish designs and colors make them a favorite among homeowners and property managers. EZ Snap Covers can walk you through each step and will guarantee a perfect fit. In fact, they are so confident you will absolutely love your EZ Snap Cover that they give a 100% money-back guarantee.


