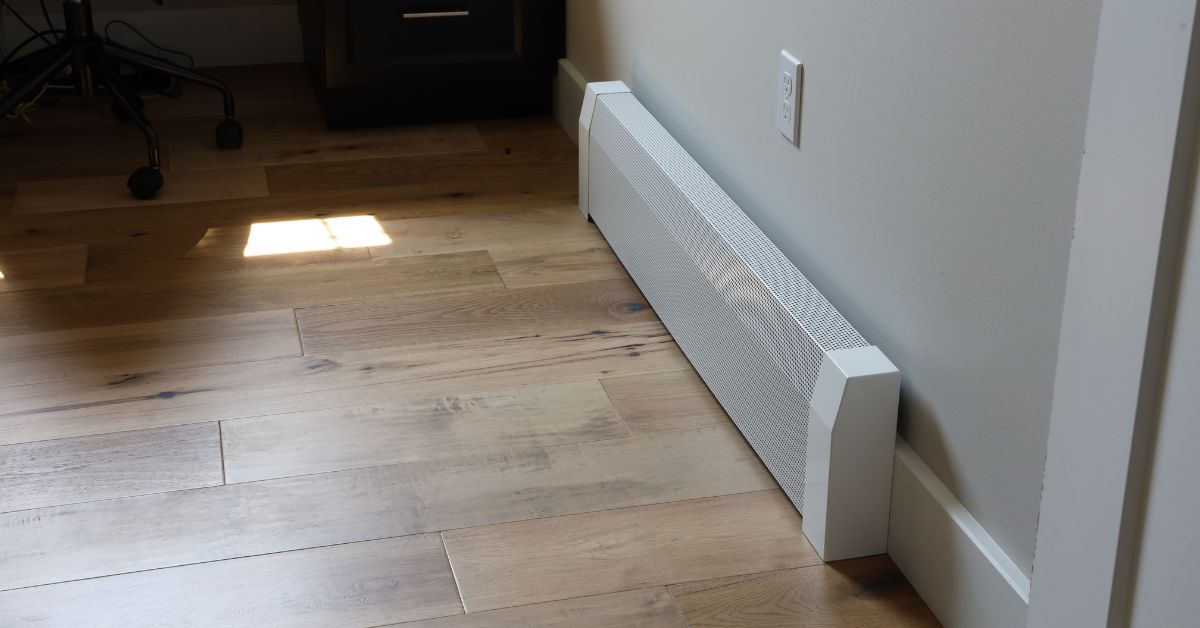
Baseboard heaters keep rooms warm and comfortable, but many homeowners overlook their end caps until damage or discoloration happens. Whether you want to refresh your system’s look or replace worn components, learning how to remove and install baseboard heater end caps helps you save time, reduce frustration, and cut costs.
With the right approach and a few simple tools, you can tackle this task without calling in a contractor. This guide covers everything from preparation and safe removal to proper installation and finishing touches, helping your baseboard heaters stay clean and run efficiently.
What Every Homeowner Should Know About End Caps
Baseboard heater end caps protect and decorate the ends of a baseboard heating unit. Their primary functions include:
-
Safety: End caps cover sharp metal edges, reducing the risk of cuts.
-
Aesthetics: They create a clean, finished appearance by hiding open ends.
-
Functionality: In some designs, end caps help guide heat flow or support the alignment between connected covers.
End caps come in different sizes and styles, depending on the heater brand and model. Common materials include painted steel, aluminum, and heat-resistant plastic. When choosing your replacements, match the size, shape, and finish to your existing units for a seamless look.
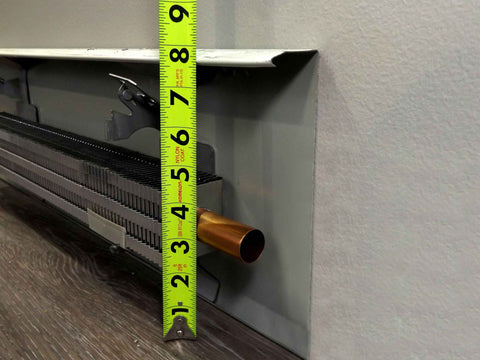
Before starting, inspect your current caps to determine the attachment method. This knowledge helps you avoid unnecessary damage when removing them and ensures you have the correct tools and replacements on hand.
If you want to replace more than just the heater end caps, pair this project with baseboard replacement covers to modernize your heating system’s appearance and improve its safety and durability.
Laying the Groundwork for Removal and Installation
Preparation ensures the process goes smoothly and reduces any risks of damage. Before touching your baseboard heater, always turn off the system. Most end caps don’t touch electrical components, but turning off the heater still prevents accidental burns and protects you from injuries.
Rushing into the work without the right tools and a clear plan can lead to damage, frustration, and extra time spent fixing mistakes. Make sure you have the right equipment, create a safe workspace, and understand the specifics of your heater model. You’ll want to gather the following tools and supplies:
- Screwdrivers (flathead or Phillips, depending on your model)
- Needle-nose pliers
- Work gloves
- Replacement end caps
- A small container for screws or fasteners
- A soft cloth for cleaning
After collecting your tools, you need to take a few steps to prepare the heater and the surrounding area. These quick tasks ensure you won’t need more parts or space in the middle of the job.
-
Clear the workspace: Move furniture, rugs, and other obstacles away from the heater.
-
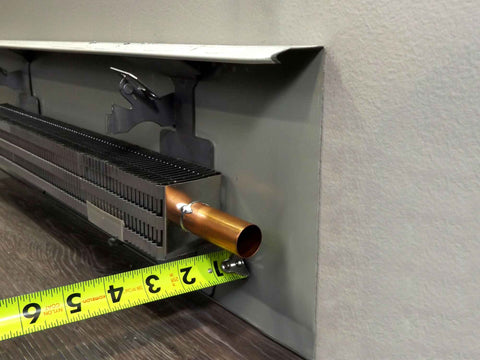
Inspect the heater: Identify how the end caps attach. Look for screws, locking tabs, or clips.
-
Take photos: Taking a quick photo of the end caps before you remove them helps you remember how everything fits together.
-
Check for rust or paint buildup: Rust or excess paint can make removing them harder, so work gently and patiently.
Removing Baseboard Heater End Caps Like a Pro
Approach end cap removal carefully to avoid damaging the heating unit or nearby walls. Work slowly, especially if your current caps are old or have paint built up on them. Removing end caps can be easy by following the following steps:
-
Loosen attachment points: If your end cap has screws, use the correct screwdriver to loosen them. Place screws in a small container so they don’t get lost.
-
Release locking tabs or clips: For models without screws, gently press locking tabs inward using a flathead screwdriver or needle-nose pliers. Apply steady pressure to avoid bending the metal.
-
Lift and slide: Most end caps lift upward slightly before sliding off the heater body. Avoid pulling straight out, as doing so can warp the housing.
-
Address stubborn caps: If the paint has sealed the edges, score the seam with a utility knife to free the cap without chipping the wall.
Smart Removal Tips To Prevent Damage
A few small mistakes while removing the end caps can leave scratches, dents, or warped parts that affect how your new end caps fit. Taking the time to follow these precautions will help you protect the heater and the surrounding wall.
- Always support the end cap while loosening fasteners.
- Don’t force components apart; loosen any visible attachment points first.
- Wear gloves to protect your hands from sharp edges inside the heater cover.
Once removed, inspect the end cap and heater housing. Look for signs of rust, dents, or wear that might affect the fit of the new piece.
The Right Way To Install New End Caps
Installing new end caps usually takes less effort than removing the old ones, but you must align them correctly. The following process will guide you through each step to ensure a secure fit and a polished look.
-
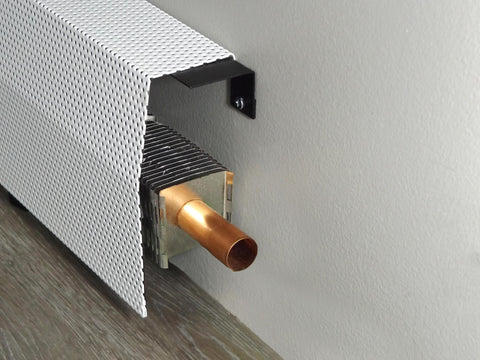
Position the end cap: Align it with the heater’s end, making sure any attachment points match up with tabs or screw holes.
-
Slide into place: Depending on the model, you may need to hook the bottom edge first before securing the top.
-
Secure the fasteners: Use the original screws or new hardware if supplied. Tighten them just enough to hold the cap firmly without warping the metal.
If your baseboard heater design connects the end cap to adjacent covers, make sure all pieces align evenly. An uneven installation looks unprofessional and can create gaps where dust and debris collect.
Maintenance Tips for Long-Lasting End Caps
Proper care keeps your new end caps looking clean and functioning well for years. Unlike other heater components, end caps don’t require frequent replacement; most last for decades if maintained properly. Here are our top maintenance tips:
-
Clean regularly: Wipe the end caps with a soft cloth and mild cleaner to remove dust. Avoid abrasive pads that can scratch the finish.
-
Check attachment points: Inspect the attachment points once or twice a year. Tighten screws or adjust clips as needed.
-
Prevent paint buildup: If painting nearby walls, mask off the end caps to avoid sealing them in place.
-
Address rust immediately: If you notice rust spots, sand them lightly and repaint with a heat-resistant finish.
Start Your End Cap Project Today
Learning the process of removing and installing baseboard heater end caps helps you maintain the safety and appearance of your heating system. With the right tools, proper preparation, and attention to detail, you can complete this project confidently without professional help. For a fast, stylish upgrade, explore EZ Snap Covers and find the perfect fit to refresh your entire baseboard heating system.


