As a homeowner, you may face the unique challenge of handling long baseboard heater covers. Whether you are dealing with covers that span entire walls or need to navigate around corners and obstacles, managing lengthy baseboard heating systems requires specific techniques and considerations.
Understanding how to handle long baseboard heater covers effectively can save you time, money, and frustration while making sure your heating system operates at peak efficiency. From measurement and installation to maintenance and replacement, each aspect demands careful attention to detail. Let’s explore the essential strategies and techniques that will allow you to handle these extended heating covers like a professional.
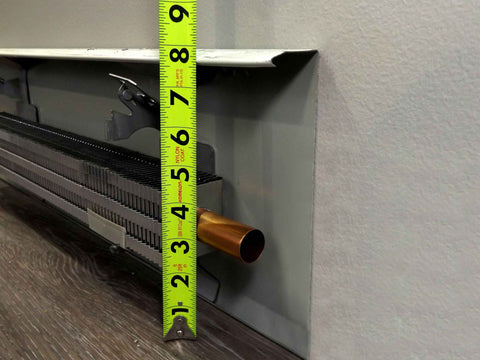
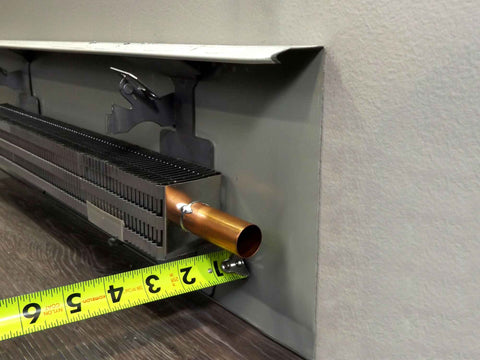
Measure Long Baseboard Heater Covers Accurately
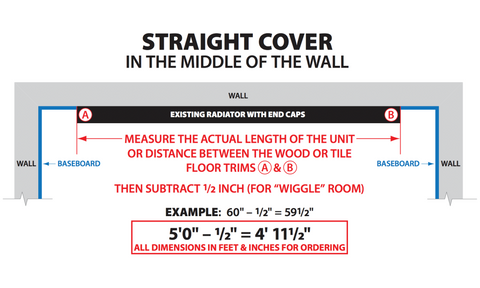
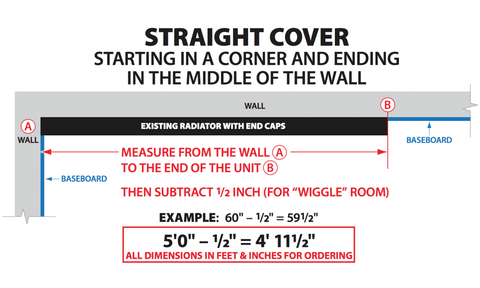
Precise measurements are crucial for a successful baseboard heater cover project. Long runs require extra care because small errors tend to compound over distance, potentially leaving you with gaps or overlaps.
Start by measuring the entire length of your baseboard heater system, including any corners or turns. Use a quality tape measure and record the measurements in both feet and inches to avoid confusion. Make note of any obstacles along the way, such as electrical outlets, vents, or furniture that might affect installation.
For runs longer than 8 feet, consider measuring in sections and adding them together. This approach reduces the likelihood of errors and makes it easier to identify potential problem areas before they become costly mistakes.
Always add a small buffer to your measurements—typically 1/4 inch—to account for minor variations in wall straightness or heater positioning. This extra space ensures a proper fit that avoids unsightly gaps.
Cut and Join Long Baseboard Heater Covers Properly
Using long baseboard heater covers often means cutting and joining multiple pieces to achieve the desired lengths. Clean, precise cuts and seamless connections between sections lead to successful project outcomes.
When cutting metal covers, use a fine-tooth hacksaw or metal snips for straight cuts. Clearly mark your cutting line with a pencil and use a straight edge as a guide. Then, file any rough edges smooth to prevent injury and guarantee a proper fit.
For joining sections, overlap joints typically work best for long runs. When possible, position the overlapping section so it faces away from the main traffic area to maintain a clean appearance. Secure the joints with appropriate fasteners so they won’t interfere with the heater’s operation.
Be sure to consider the expansion and contraction that occur with temperature changes. Leave small gaps between joined sections to accommodate this movement and prevent buckling or warping over time.
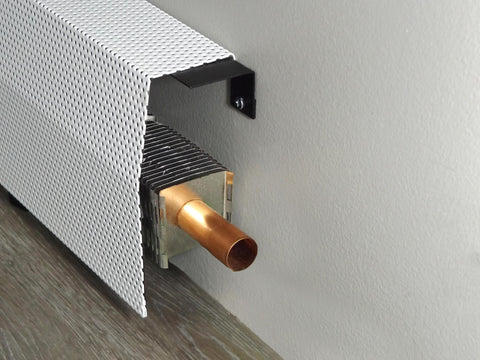
Install Long Baseboard Heater Covers Efficiently
Installing long baseboard heater covers requires a systematic approach to maintain alignment and prevent sagging. Start at one end and work your way along the entire length, checking for level and proper positioning at regular intervals.
Use the appropriate mounting hardware spaced according to manufacturer specifications. For long runs, this typically means mounting points every 16 to 24 inches, depending on the cover material and design.
Support long sections during installation to prevent bending or damage. Having a helper makes this process much easier and reduces the risk of accidents. If you are working alone, use temporary supports to hold each section in place while you secure the mounting hardware.
Check that the covers don’t interfere with the heater’s operation or air circulation. Long runs can sometimes sag slightly in the middle, potentially restricting airflow and reducing heating efficiency.
Navigate Corners and Obstacles Effectively
Long baseboard heater runs can encounter corners, doorways, and other obstacles that require special handling. Planning your approach to these challenges before you begin installation saves time and leads to professional-looking results.
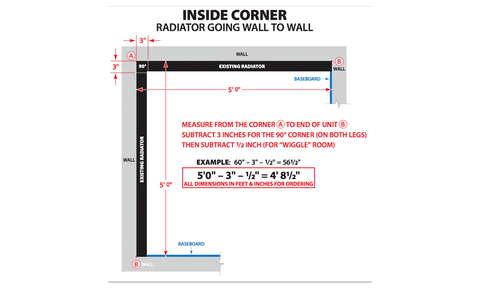
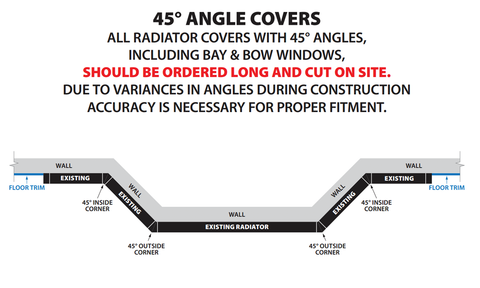
For inside corners, miter cuts typically provide the cleanest appearance, while outside corners may require special corner pieces or carefully planned overlapping sections. Measure and mark corner angles precisely, as they’re rarely exactly 90 degrees in real-world installations.
When working around obstacles like electrical outlets or floor vents, it’s best to create templates from cardboard before cutting your covers. This allows you to test fit and make adjustments without risking damage to expensive cover materials.
Door openings require careful consideration of clearance and appearance. Plan your cover sections to end neatly at doorways, and consider using baseboard heater replacement covers that complement the room’s existing trim work.
Maintain Long Baseboard Heater Covers Year-Round
Long baseboard heater covers require regular maintenance to function properly and retain their appearance. The extended length means more surface area to clean and inspect, but systematic maintenance keeps the job manageable.
Clean the covers monthly during heating season using a vacuum with a brush attachment. Take time to remove dust and debris that can restrict airflow and reduce heating efficiency. For deeper cleaning, remove the covers completely and wash them with mild soap and water.
Inspect the entire length of each cover regularly and look for signs of damage, warping, or loose mounting hardware. Pay special attention to joints between sections, as these areas experience the most stress. Address issues promptly to prevent small problems from becoming major concerns.
Replace Long Baseboard Heater Covers When Necessary
Eventually, even well-maintained baseboard heater covers reach the end of their useful life. Long runs may show uneven signs of wear, with high-traffic areas deteriorating faster than protected sections.
Replacement may be necessary if you notice any of the following:
- • Significant rust, corrosion, or damage that affects appearance
- • Warping or sagging that restricts airflow
- • Loose or damaged mounting points that can’t be repaired
- • Outdated appearance that detracts from your home’s value
When replacing long baseboard heater covers, consider upgrading to higher-quality materials that offer better durability and appearance. Modern covers also often provide improved airflow and easier maintenance compared to older designs.
If you’re able, plan all replacement projects during warm weather when your heating system isn’t in use. This allows you to work at a comfortable pace without worrying about maintaining heat in your home.
Transform Your Space With Professional Results
Handling long baseboard heater covers successfully requires patience, planning, and attention to detail. The techniques outlined here will allow you to achieve professional-looking results that enhance your home’s appearance and heating efficiency.
Remember that quality materials—like baseboard heater covers from EZ Snap Covers—and proper installation techniques pay dividends over time through improved performance and reduced maintenance requirements. Taking time to do the job correctly saves money and frustration down the road.
Whether you’re updating existing covers or installing new ones, a successful outcome requires careful measurement, precise cutting, and systematic installation. With these skills at the ready, you can confidently tackle even the most challenging long baseboard heater cover projects.


